Toolkit Overview : Define : Plan : Gather : PRESERVE : Metadata : Storytelling : Share : Recommendations
El Grito de Sunset Park Use Case
PRESERVE YOUR VIDEO FILES
WHAT IS THIS?
After you have gathered your media, you need to take steps to safeguard your videos so that you can find and use them later, and so that they don’t get accidentally lost, altered, or deleted. For the El Grito project, this involved cleaning up and organizing the files in a systematic way, generating documentation to allow us to check and validate the files, and securely storing and backing up the files.
In this section, you will find our documentation on:
- How to clean up filenames, and organize your files in a standardized and structured way for long-term storage and access.
- How to generate fixity documentation that will allow you to check and validate your files later on.
- How to safely store your archived collection.
WHY DO THIS?
By taking these steps, you will:
- Ensure your videos do not become lost, accidentally deleted, or corrupted.
- Make your videos easier for everyone on your team to find, identify, and understand.
- Enable you to confirm the identity and integrity of your video files for authentication purposes.
- Allow you to more easily share your videos with others, if you choose.
NOTE
This workflow presumes that the information/data contained in the video files are the objects of preservation, and that the hard drive serves as a storage and delivery mechanism. There may be other situations where the hard drive is in itself the object of preservation, such as in a digital forensics case, which would require a different workflow than the one outlined here.
WORKFLOW AT A GLANCE
EQUIPMENT / TOOLS NEEDED
- The video files you are working with (see Gather from Hard Drives for more on getting set up with this).
- Exactly, a free software for making standardized archival packages.
- Digital storage for the archive, with sufficient capacity to store the collection.
- Separate digital storage for the backup, with sufficient capacity to store the collection.
- Additional separate digital storage for the second backup of the archive, in a medium that can be taken offsite, with sufficient capacity to store the collection.
Clean Up Filenames
Filenames that use characters that are reserved for the computer system can cause problems for filesystems, software, and platforms down the line. This can cause problems with your back ups, ingest processes, and other activities critical to preserving your videos.
Reserved characters include !@#$%^&*()~`:;”’.?/+= (basically every symbol other than _ or -). Accents and diacritical marks can also cause issues. These need to be fixed before ingest.
SIMPLE AUTOMATION
![]()
Automator is included in the Mac OS and allows you to automate a variety of tasks, including batch re-naming files.
1
Find bad filenames
Examine the files that have been selected for the archive. Filenames that need to be cleaned up are:
- Filenames with reserved characters (!@#$%^&*()=+?,./:”;’{}|[]~` — i.e. any characters other than letters, numbers, -, or _ ).
- Spaces are usually ok, but sometimes not, so better to avoid using them if possible.
- Super-long filenames also cause problems (the maximum number of characters for filepath, i.e. the filename + names of all folders above it, is 256 characters).
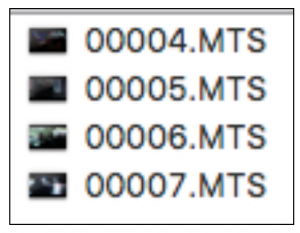
If filenames have not been changed from camera-assigned names, there should be no problem.
2
Change filenames
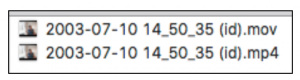
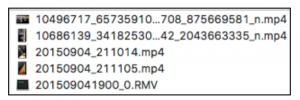
If only a few filenames need to be changed, this can be done manually by just right-clicking the file and renaming it. Don’t make changes to the filename beyond what is necessary to clean it up. Remove reserved characters and spaces, and if it helps with making the filename readable, replace them with underscores (i.e. _ ).
![]()
Example of a bad filename, and a cleaned up version of the filename.
If a lot of filenames need to be changed, you can use the built-in Mac Automator tool. Create a “Workflow,” and add the step “Get Specific Finder Items,” and then a “Rename Finder Items” step for each character you want to replace.
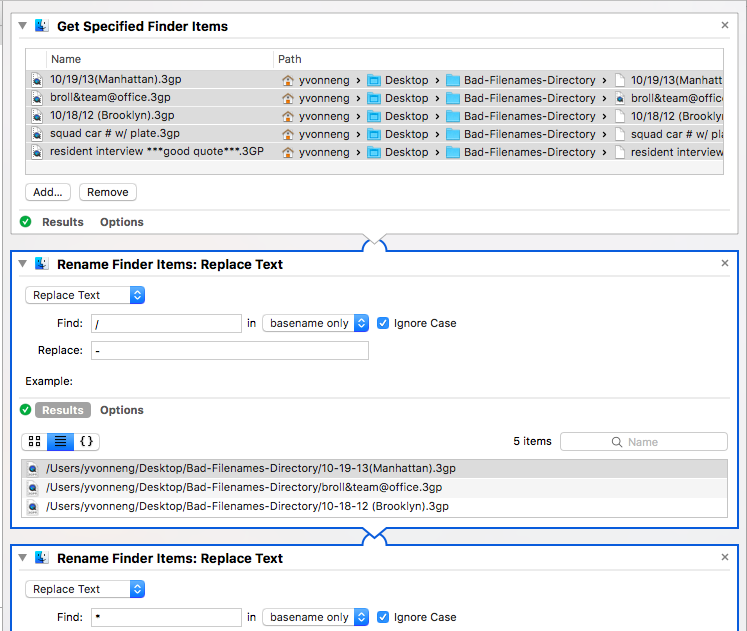
Example of how to use Automator to clean up filenames
During Ingest, files will be transformed into “archival packages,” which are the basic units of an archival collection.
Having a good organizing structure (i.e. the makeup of the archival packages, and the directories and subdirectories in which they are filed in) will make your collection easy and intuitive to navigate.
PACKAGING STANDARD

BagIt is a standardized, hierarchical file packaging format widely used in archives.
3
Decide on the make up on your archival packages
A package can contain a single video file or multiple video files. How you decide to package your files depends on how much footage you have, how granularly you want to divide it up, and how much background knowledge you have about where the files come from.
Two useful guiding principles from the archives world are provenance and original order. Provenance refers to preserving the original context of creation by keeping records from different sources/origins separate. Original order is also about preserving context, and refers to restoring or maintaining records in the original sequence in which they were created.
While following the principles of provenance and original order, there can be some flexibility about what constitutes a single package, and sometimes you will be working with incomplete background information. Do what makes sense for your project.
Here are some real-life examples of how files have been made into packages in the El Grito project:
 Package 1: Video files from a single policing incident, filmed in sequence.
Package 2: A single video file filmed at the same policing incident, but by a different camera/ cameraperson.
Package 3: Two video files (one master, one for web) made from digitizing a single miniDV tape.
Package 4: Multiple videos about a single incident, from various sources, but collected by one individual.
4
Decide on your directory structure
This is optional, but organizing your packages into directories and subdirectories can make your collection easier to navigate compared to having them all in one top-level directory.
In designing your directory / subdirectory structure:
- Consider the logic behind how the original/source hard drive is organized. It may reflect how the source thinks about the collection or how they will use the content.
- Consider the purpose for which the collection will be browsed, accessed and used in the future.
- Define each level of the directory structure by how it sorts your packages — e.g. “by date,” or “by case,” or “by officer,” “by type,” etc, etc — and follow this consistently throughout your collection.
- On any single directory level, all the folders should sort the content in the same way. In other words, don’t have some folders that sort “by date” and other folders that sort “by officer” on the same directory level, as this will create confusion as to where a package is filed.
5
Document and communicate
Document and communicate the organizing structure to anyone that will be involved in the next ingest phase so that work is done consistently.
In archives, “ingest” is the process of accepting a new item into a collection and making it ready for long-term storage according to the archive’s rules and standards. This involves making an “archival package.”
The instructions below outline the steps we followed to for create archival packages for the El Grito project based on a packaging standard developed by the Library of Congress called BagIt, using a free tool called Exactly.
Using the standard and tool is useful because it automates a lot of the work and creates self-describing packages can be easily shared, identified, and validated (i.e. shown to be complete and unaltered — important for evidentiary uses!) later on.
PACKAGING TOOL

Exactly is a free and open-source application for packaging files with customized metadata and fixity data.
6
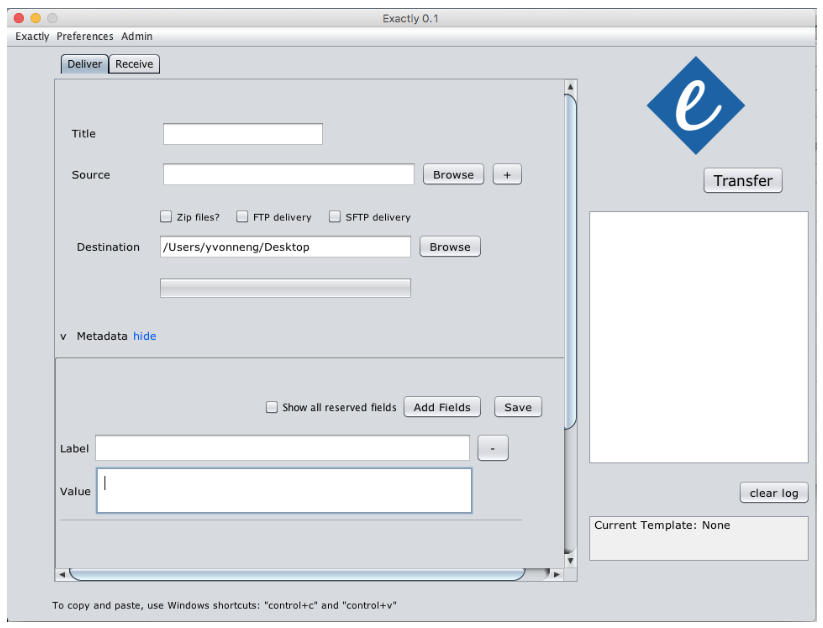
Install and open Exactly
Download and install Exactly (for more information check out the User Guide from AVP). When you open the app, the interface will look like this:
7
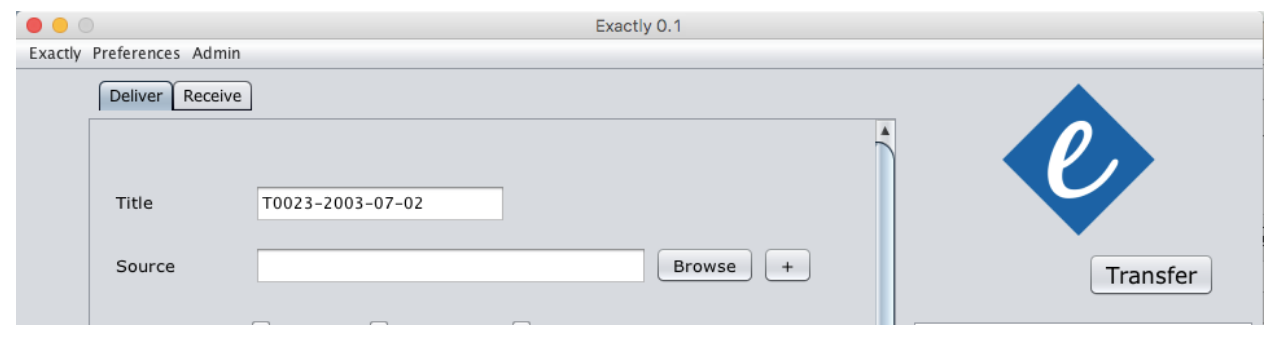
In the Title field, enter the package name
Use a consistent naming scheme for your packages.
For the El Grito project, the package name followed the template: PackageID-ContentCreationDate. So, a Title for a package might look like: P0001-2016-06-15.
8
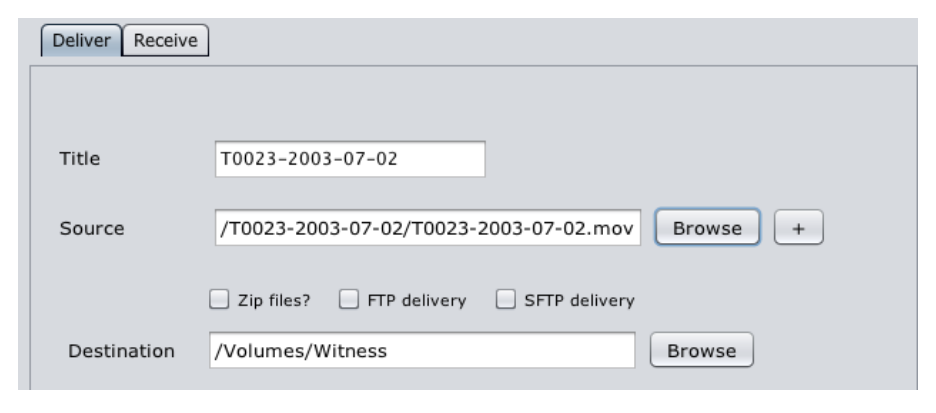
Enter Source and Destination information
For Source, navigate to the file(s) that you want to package. For Destination, navigate to the archival storage location where you want Exactly to create your package folder.
9
Enter metadata for the package
Metadata that included in a package should be minimal metadata that will not need to be updated or changed over time, and that is useful for identifying the package, if say, it is sent to someone.
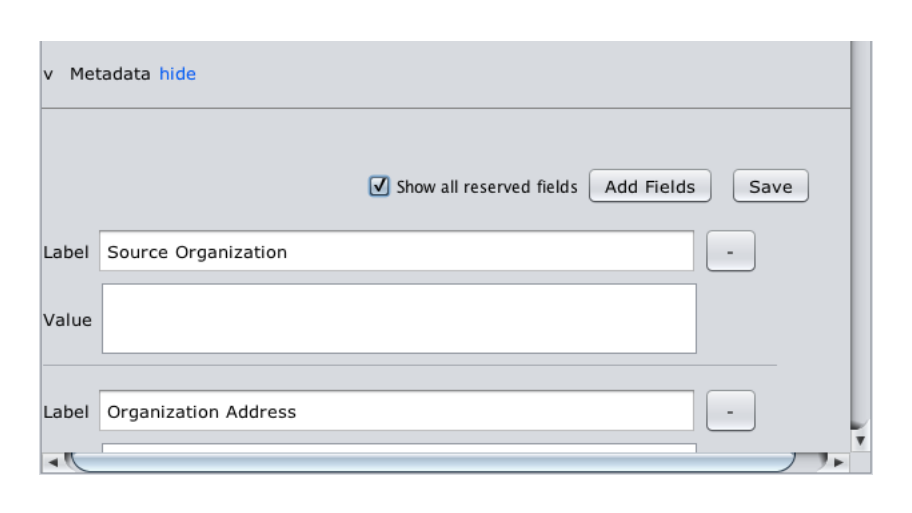
To add metadata in Exactly, click on “show” next to Metadata to reveal the metadata entry fields:

Check “Show all reserved fields” to reveal the pre-set BagIt metadata elements. You don’t have to use all of them, and/or you can define your own, but this can save you some work. To eliminate the extra pre-set fields, click on the “–” button next to the field label:
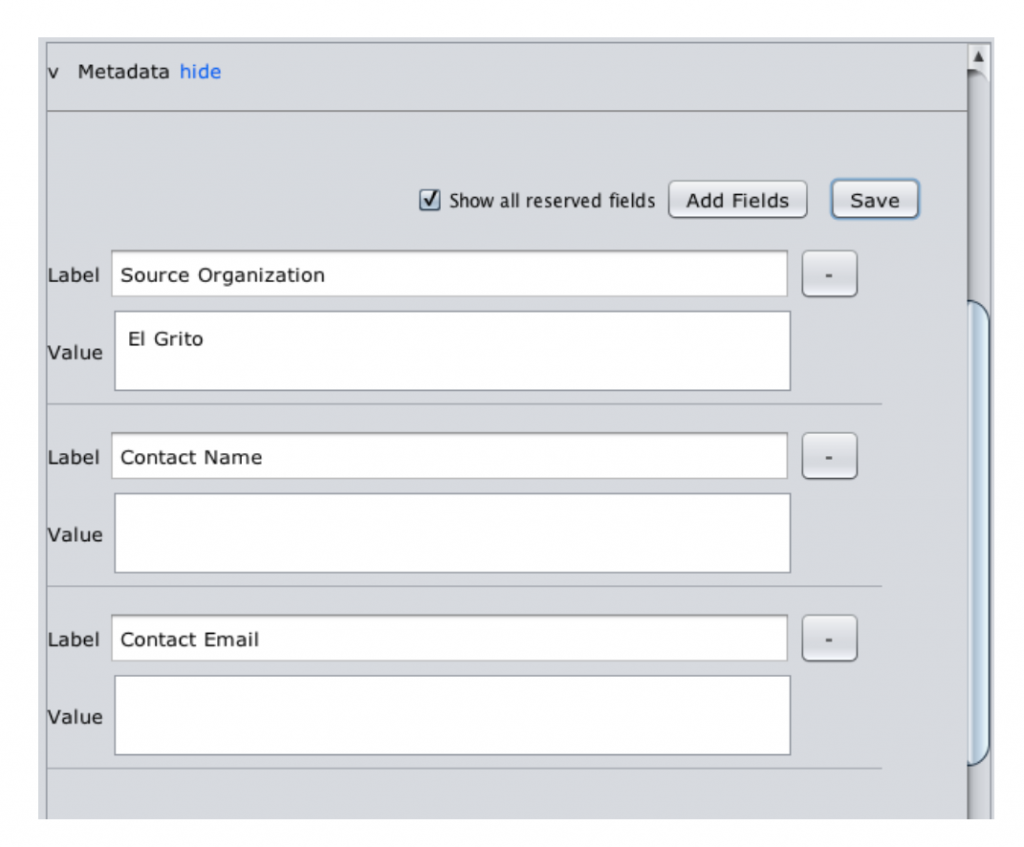
For the El Grito project, we used the pre-set Source Organization, Contact Name, and Contact Email fields. Enter metadata values and hit Save:
10
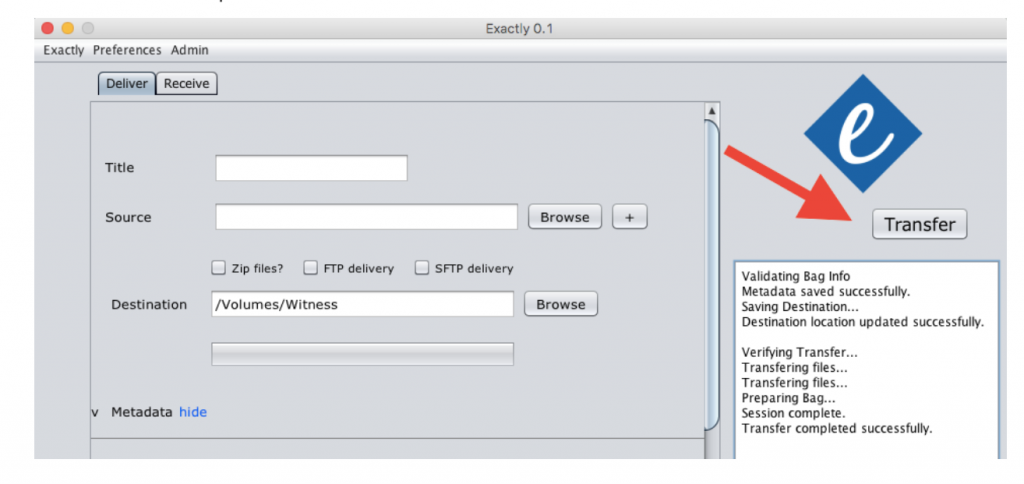
Create the package!
When you’re ready, press the Transfer button on the top right side of the window. You will see updates in the log window as the transfer takes place.
When the process is done, check for your newly created package in your storage destination. It should look something like this:
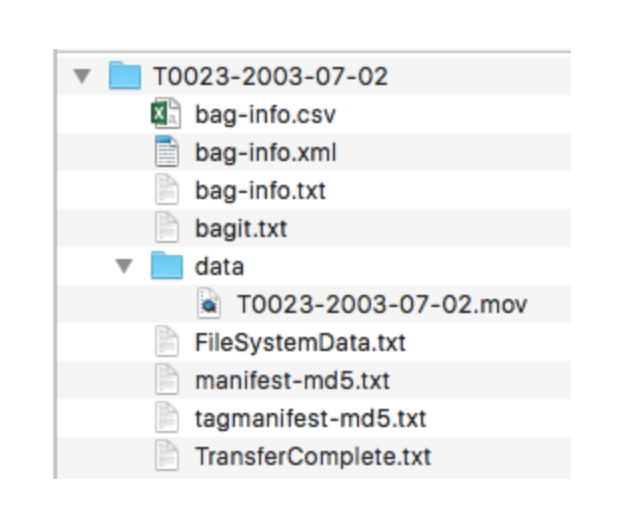
In addition to your video file(s), you can see that the package includes a number of text files. These are just (human- and machine-readable) text files that are part of the BagIt specification, which help to identify and validate the package (more on validation below).
The text files include:
- bag-info (in CSV, TXT, and XML formats): includes the metadata that you entered in the step above.
- manifest-md5 and the tagmanifest-md5: like packing lists in a box; they list the files that should be in the package along with their MD5 checksums (checksum: a string of letters and numbers that can be used to check whether the files have been changed).
- FileSystemData and TransferComplete: describe the filesystem that the file came from and the transfer process, for authentication purposes.
- Bagit.txt: simply states that this package follows the BagIt standard.
Repeat this packaging process for all the items you want to add to your archival collection. The metadata you entered to create the first bag will remain when you create subsequent bags so you only have to edit fields where the metadata is different from the previous bag.
11
Validate and verify packages as needed
To validate or check a package (say, if you want to make sure it hasn’t changed or been altered), use the Receive tab in Exactly:
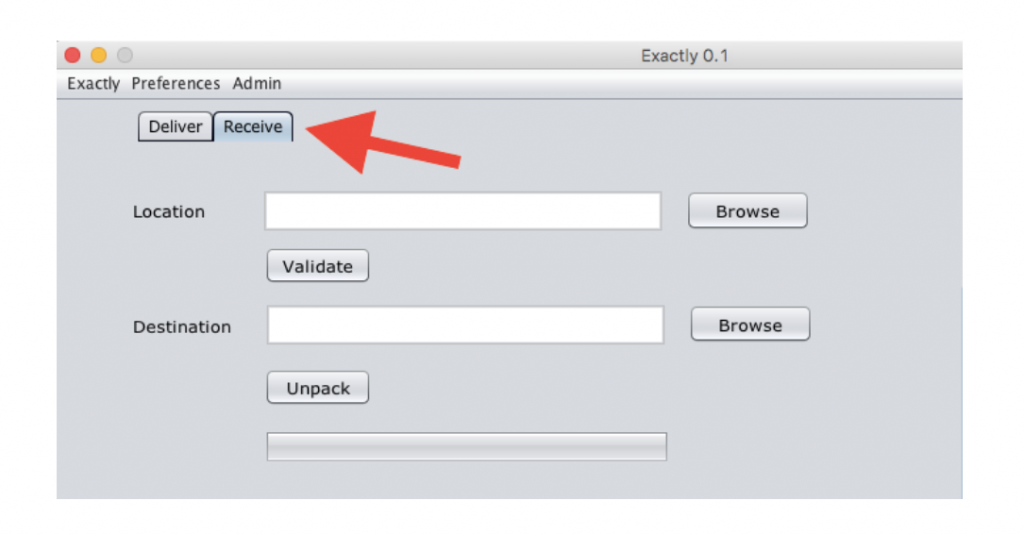
Point to the Location of the package and press Validate. The package will be valid if all the files in the “packing lists” are present (and no new files) and if their checksums match:

How BagIt validation works:
- When you create a package with Exactly, the documents it generates include a list of files and fixity data about each file, commonly referred to as a hash or checksum. A checksum is a calculation that looks like a string of numbers and letters, and is unique to each individual digital file. For this reason, checksums are often referred to as ‘digital fingerprints’.
- A checksum won’t change unless the file is changed, so it can be used to detect if the file has been altered (e.g. edited, corrupted, etc.). If you send a “bagged” archival package to someone, the validator in Exactly uses the checksums to confirm that nothing was altered in transit.
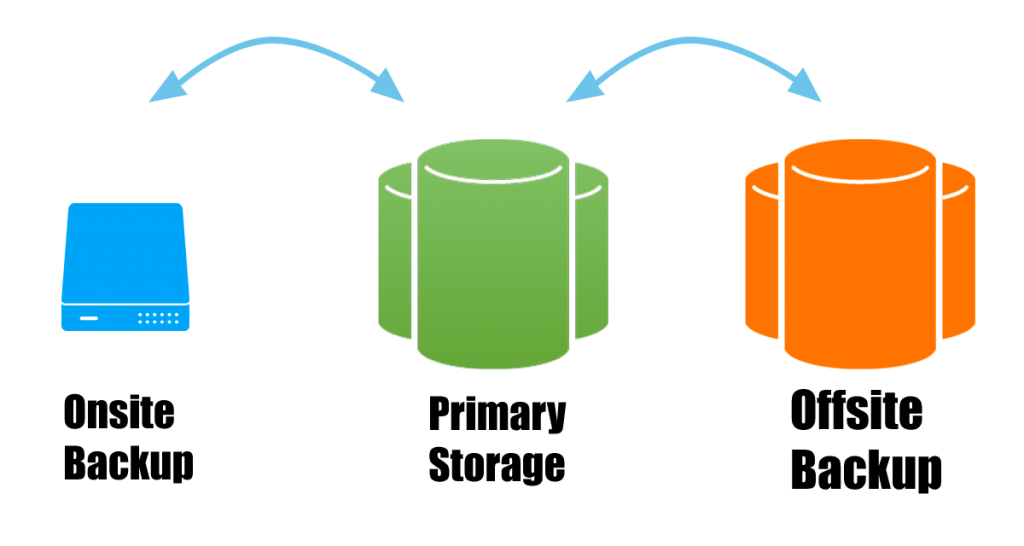
If you only have one copy, you are only one accident / spill / hard drive failure away from losing all of your content and hard work.
Recovering content from failed drives is not always possible, and can be very expensive.
12
Create at least one backup on a separate device
There are a few ways you can do this:
- You can simply drag and drop a copy your collection from the primary hard drive to the backup drive. This is the simplest way but can be frustrating if you’re copying a large collection that takes a long time.
- You can use a command-line utility called rsync, which is a more reliable way of copying a large collection that will let you re-start from where you left off if the copying is interrupted.
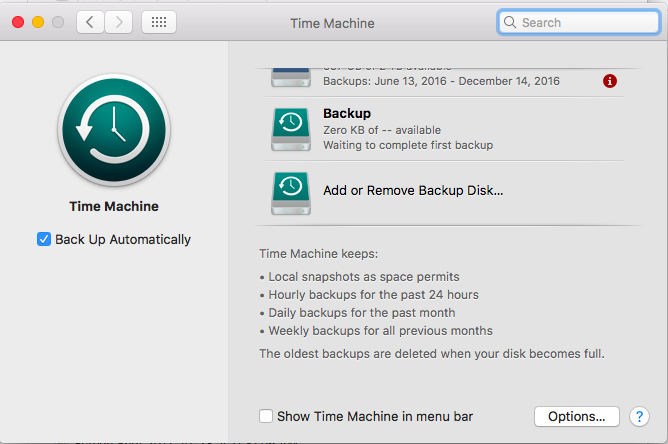
- On a Mac, you can use the built-in Time Machine utility to back up an external drive.
In System Preferences, select Time Machine. Then add your backup disk:
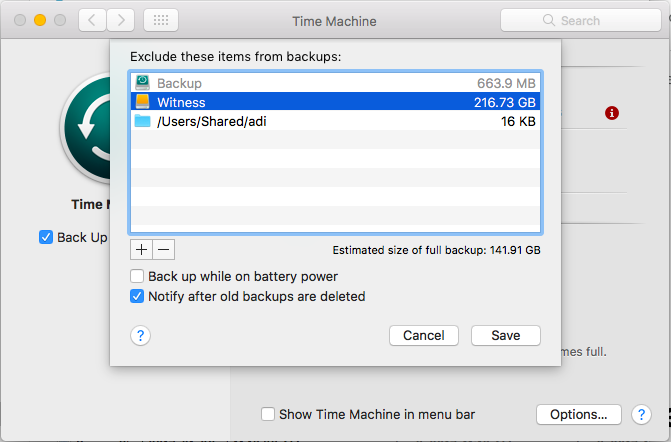
Select “Options…” By default, Time Machine does not back up external drives, so you need to remove the drive you want to back up from the list of excluded items:
BACKUP TOOLS

Rsync is a free utility for efficiently transferring and synchronizing files across computer systems, released under a GNU General Public License.
![]()
Time Machine is the built-in backup feature on Macs.
13
Ideally, have two backups
Ideally, you want to create two backups — one nearby so you can quickly recover any lost/corrupted files, and one offsite for more catastrophic recovery.
Even you only have an onsite backup, try to keep it in a different place (e.g. in another room) from your primary copy.
Securing justice can take a long time. You may need your videos years from now, and they need to remain intact, playable, and authenticatable to be useful.
14
Monitor your files
Check your saved video files at least once a year to make sure you can read them. You can use the “Validate” function in Exactly to do this.
Restore from your backups as needed.

15
Monitor your drives
If a drive starts making unusual noises or starts to malfunction, replace it immediately. Otherwise, plan to replace your drives and re-copy media to them every five years or when necessary to avoid data loss.
16
Monitor your formats
In the longer term, your video file formats may become obsolete, or unsupported on newer hardware and software (e.g. in the way, say, Flash video is no longer supported on iOS devices today). You should still maintain your original files, but you may also need to create copies in newer formats (i.e. transcode) in order to keep them usable. Plan to do so while you still have the hardware/software to read your original files.
Additional Resources
WITNESS resources
Preservation workflows
-
Open Workflows for AV Archiving (AMIA Open Source Committee)
-
Digital Preservation Workflow Curriculum (AV Preserve and Digital Preservation Network)
-
You’ve Got to Walk Before You Can Run: First Steps for Managing Born-Digital Content Received on Physical Media (OCLC Research)
-
Walk This Way: Detailed Steps for Transferring Born-Digital Content from Media You Can Read In-house (OCLC Research)
Tools and technical reference
-
The Collection Management System Collection: Crowd-sourcing a list of digital repository options (Ashley Blewer)
-
POWRR Tool Grid (Digital POWRR)
-
The BagIt File Packaging Format Specification (Library of Congress)
-
Exactly User Guide and Webinar (AVPreserve)
-
Hard drive reviews (Backblaze)
-
Sustainability of Digital Formats – Moving Image (Library of Congress)