Toolkit Overview : Define : Plan : GATHER : Preserve : Metadata : Storytelling : Share : Recommendations
El Grito de Sunset Park Use Case
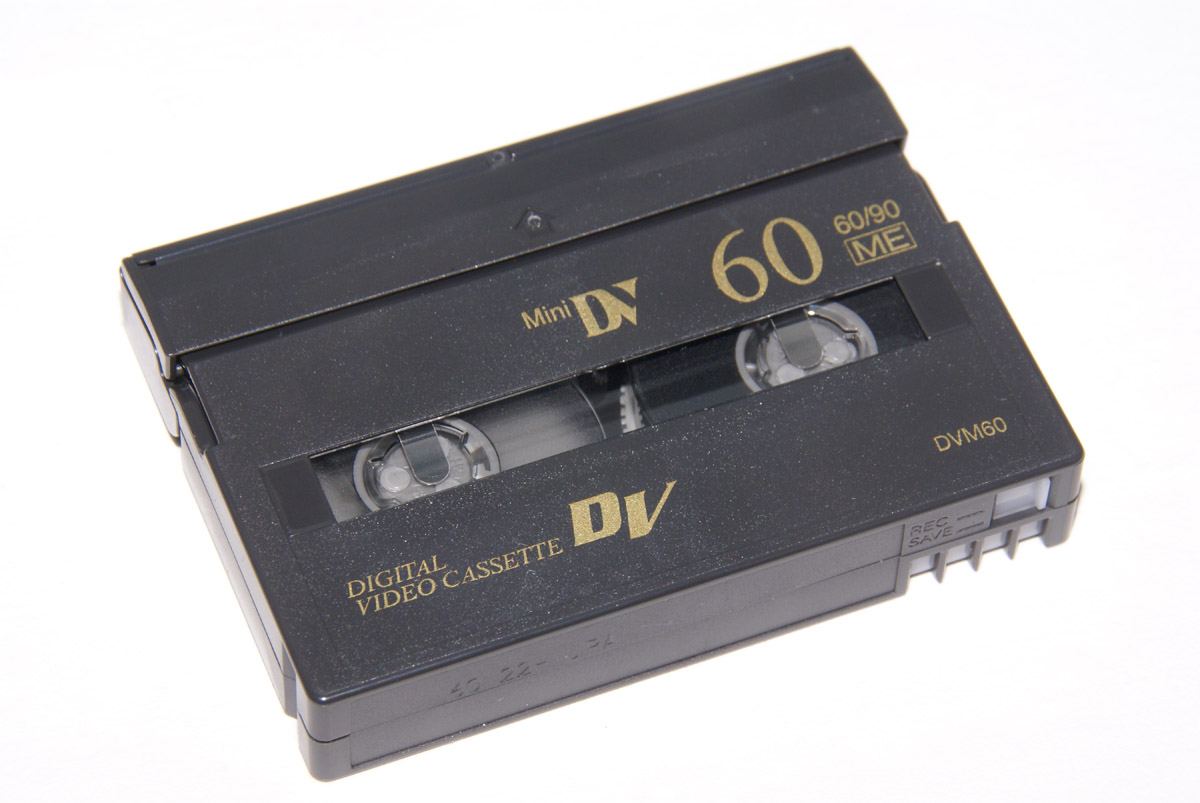
DIGITIZING MiniDV TAPES
WHAT IS THIS?
This section discusses how to organize and “digitize” a collection of MiniDV video tapes.
(DV stands for “Digital Video,” so the video is actually already digital, but needs to be captured off the tape and saved as a digital file.)
WHY DO THIS?
- MiniDV was one of the last tape-based video formats in popular use, but it is now obsolete. That means that new tape stock, cameras, and playback machines are no longer being manufactured.The only way to record and play miniDV tapes is with older/used equipment, which will eventually break down. Content on miniDV tapes needs to be transferred before there is no way left to play it.
- MiniDV is an inherently fragile tape format. The tape was made very small and thin so that it could fit in a “mini” cassette, but this means it can be easily damaged. Most videotape has a lifespan of 20 to 25 years even under proper storage and handling. Over time, and with heat and moisture, tape starts to warp and degrade, and the metal particles that the content is held on demagnetize or flake off.
- Following this workflow and capturing in miniDV’s native DV format preserves the authentic original content and metadata. Once captured as a digital file, DV content can be more easily shared accessed, and copied.
- The original miniDV tape might be valuable to keep for evidentiary purposes. Digitizing the tape will help preserve it by protecting it from handling. (Even if not for evidentiary purposes, we recommend keeping your original tapes as a backup copy, and in case you ever need to re-digitize.)
CAPTURE STATION REQUIREMENTS
- MiniDV deck or camera with DV/Firewire port.
- Firewire cable (check deck & computer for Firewire 400 vs. 800, and number of pins)
- Computer with Firewire port (or less ideally, Thunderbolt port + Thunderbolt to Firewire adapter. Note that we tested this in a few situations, and it doesn’t always work — the computer may have trouble seeing the DV deck). Also, use a computer that won’t be used for other tasks at the same time.
- Capture software (such as Final Cut, Premiere, or LiveCapturePlus) capable of capturing miniDV in its native digital format, DV.
- Minimum ~20GB of local computer storage for tape capture (Temporary, can be deleted after copied to more permanent storage).
- Hard drive for storing tape captures + separate backup drive. Plan for ~12GB per hour of tape, and leaving ~25% of the drive free.
- Cable for connecting hard drives to computer.
- MiniDV cleaning tape.
- Tape labels.
- Ideally, a monitor for observing the video signal coming out of the tape deck, but capture can be done without this.
FIREWIRE INTERFACES
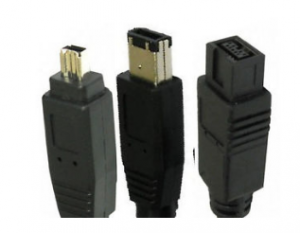
Firewire 400 4-pin, 6-pin, and Firewire 800 9-pincable interfaces.
WORKFLOW AT A GLANCE
-
Organize the tapes, roughly by date.
-
Create a basic tape inventory, including a number to be given to each tape, which is called its unique identifier.
-
Label each tape with its number/unique identifier.
-
Create a digital file from the miniDV tape, which is called capturing the tape. Monitor the capture.
-
Save and name the digital file(s).
-
Review the digital file(s) for completeness and quality.
-
Move the digital file(s) to permanent storage.
-
Package the files with metadata and file fixity information (See Ingest for this step).
-
Backup files in permanent storage on a regular basis.
STEP-BY-STEP WORKFLOW
1
Organize the tapes
- Find and put together all the tapes that are part of your project. Collect any related documents that may be helpful for identifying and describing the tapes too.
- Roughly organize the tapes in order. It doesn’t have to be absolutely perfect. Put tapes that were recorded together (e.g. a 3-hour event recorded over the span of 3 60-minute tapes) together.
- There will likely be some completely unlabelled/unknown tapes. Consider giving these to the volunteer most familiar with your work and history. They can try to identify the tape when creating the digital file.
- Identify any duplicates that don’t need to be created into digital files. You’ll want to capture from the original/earliest generation tape possible. Hold on to the duplicates though — you may need to capture from it if there is a problem with the original.
- Divide the collection up among your volunteers. Keep in mind that volunteers will become knowledgeable about the content on the tapes they are working on, and the contents of one tape may provide information for a related tape. So try to give them related tapes to work with (e.g. all the tapes from one year, all the tapes related to a specific event, etc.).
2
Create a basic tape inventory
A tape inventory is a list of all your tapes, and is a useful way to easily see what you have. This tape inventory can be incorporated into a larger database later on.
- Create a basic template for your inventory. An inventory should be very simple, and just include basic identifying information. It is not meant to be a very descriptive. Some organizations have created templates for tape inventories, including AVCC by AVPreserve and AV Compass by Bay Area Video Coalition. We used a shared Google Sheet for the El Grito tape inventory. Download our template here.
- Volunteers should review the template together, make any agreed-upon changes, and ensure that each person understands what each column in the inventory means and how to fill it out.
- You can pre-populate the spreadsheet with the unique identifiers you intend to use (For the El Grito project, unique identifiers for tapes began with the prefix “T” followed by a 4-digit sequential number, e.g. T0001, T0002, T0003). These identifiers will be used to label the tapes. Volunteers may divide up the spreadsheet rows in chunks among themselves according to the number of tapes they are processing.
- Because the tapes in this collection are fragile, volunteers should not play back the tapes before creating the digital file just for the sake of filling out the inventory. Instead, they can leave certain spreadsheet cells blank, and fill them in during/after the tape has been captured.
3
Label the tapes
This stage can be performed at the same time as creating the tape inventory, above.
- Apply a label with the unique identifier assigned on the inventory sheet to the case and tape (A label on the case is easy to see when on a shelf or in a box, but the tape itself must be labeled too, as it can be easily be put in the wrong case). You can also just write on an existing label. The label for the tape must be the appropriate size. Do not cover up any mechanisms on the tape or the tape window. Also take care to not cover existing information written on the case or tape.
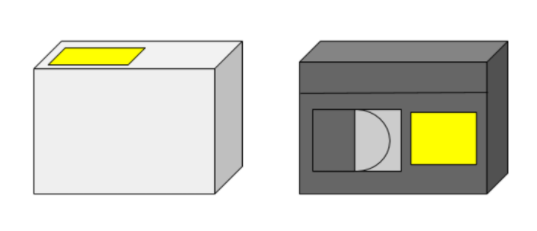
Where to put the labels on the tape and case.
4
Capture the tapes
This is the most time- and labor-intensive part of the process. Expect at least a 1.5:1 ratio of capture time to tape duration (i.e. 1.5 hours to capture a 1 hour tape).
- Using the inventory, volunteers can determine which tapes are the priority for capture, and how to effectively structure their work day (e.g. doing a short 15 min tape instead of starting a 60 min one near the end of the day, etc.)
- Connect the deck/camera to the computer with a Firewire cable. If the deck/camera hasn’t been used in a while, test it with a junk tape first.
- If deck/camera heads are dirty or if the tape shows a lot of visual errors (called dropout), play a cleaning tape through the deck for 10 seconds. You may need to run the cleaning tape periodically if capturing a lot of degrading tapes. Unfortunately, not all dropout errors can be solved by cleaning. NOTE: Cleaning tapes will eventually wear on your tape heads, so don’t overuse. NEVER fast-forward or rewind a cleaning tape in the deck. To protect limited equipment, facilitator should demonstrate proper use of cleaning tape.
 Example of head clog (left image) and dropout (right image) on miniDV. Try cleaning the deck if you see these issues.
 - Inspect the tape (look at the outer shell and the magnetic tape inside). Never put a damaged or degraded tape in the tape deck.
- Click the Rec-Save tab to Save mode to prevent accidental overwriting.
- If tape is not rewound, fast forward the tape to the end first, then rewind all the way to the beginning. This creates a tight tape pack for steady playback. Also do this if the tape pack looks loose or uneven.
- Open the software you will be using to capture the tapes. No matter what software you are using, your capture settings must be DV NTSC as this is the native digital encoding for miniDV tapes (unless you are in a PAL region). Selecting any other type of encoding means that you will be re-encoding the video, which loses data and lowers quality. We will use Quicktime (.mov) as the container format for the DV files.
- Follow the software-specific instructions for the capture:
- Capture using LiveCapturePlus (from WITNESS)
- Capture using Final Cut Pro 7 and older (adapted from XFR Collective)
- Capture using iMovie (2013) (from Apple)
- Capture using Final Cut X (from Apple)
- Capture using Premiere Pro (from Adobe)
9. Monitor the capture, ideally on a separate monitor attached to the playback deck (i.e. not on the computer capture screen). Capture will take place in real-time. Do not run other software on the computer during capture. Capture the whole tape, unless it’s not full. When a video ends, fast-forward the tape a little to make sure additional footage wasn’t recorded later on the tape.
10. If the tape starts squealing or crunching any time during capture, stop the playback immediately. This is a sign of tape degradation or a mechanical problem.
COMMON PROBLEMS WITH MINIDV
MiniDV capture can be finicky, and sometimes you will need to restart the capture or do some manual tweaking. Some common problems include:
- Dropout/errors or tape damage that cause capture to stop. Try running a cleaning tape for 10 seconds and restarting the capture. If the tape is damaged, you may need to capture the tape in separate pieces, manually skipping over the damaged area. The most common place where dropout or other errors occur are at the beginning of the tape. Skip damaged sections by setting in- and out- points in the capture software, trying to save as much of the video as possible. You’ll end up with a capture with multiple files — that’s ok.
- Timecode break, which is any jump or gap in timecode numbers. MiniDV timecode breaks happen when a continuous recording is interrupted, leaving a gap in recording (e.g. if the camera battery dies, if someone takes the tape out of the camera and puts it back in again to record, if someone plays back a tape during recording, etc.). Usually this is not a problem if you make sure the capture is set to make a new clip whenever there is a break, but sometimes the capture software gets confused. When capturing with new clips for timecode breaks, you will end up with a capture made up of more than one file — that’s ok.
- Software can’t find the deck. Usually this can be resolved by unplugging-and-replugging the equipment being used, and restarting the software/computer. You can also try switching capture software (e.g. switch to LiveCapturePlus if you’re using Final Cut or vice versa).
5
Save and name the file(s)
- Once the capture is complete, open the digital file(s). If the tape had timecode breaks or other reasons for creating new clips during capture, you may have more than one file.
- If the software hasn’t already done it for you, name the file after the tape, e.g. T0001.mov. If you have multiple files from a single capture, add a dash and a sequential number, e.g. T0001-1.mov, T0001-2.mov, T0001-3.mov.
- If you have multiple files for a single tape, put the files together in a folder named with the tape ID and content creation date, in this manner: TapeID-yyyy-mm-dd, e.g. T0001-2003-06-28.
- If viewing multiple files for a single tape is inconvenient for your volunteers, you can stitch the files together to create a more accessible copy. You can also compress that copy to make it smaller and easier to share.
6
Review the files
Review the files for quality and completeness. Do this by opening each file in a video player, like VLC or Quicktime Player. Scroll through the video, and playback in real-time at least 30 seconds from each of the beginning, middle, and end.
![]()
Video Stitching & Compression
When digitizing videotape with errors or timecode breaks using certain capture software, you may end up with many (sometimes hundreds) of separate digital files. While you should preserve the originally captured files for archival purposes, you may also want to also create more easily usable and viewable access copies. This may involve “stitching” or concatenating clips together, and transcoding/compressing them to a different format.
7
Move the files
- If the files pass quality control, copy them to the storage hard drive. Make sure the files copy completely.
- If you have space on your local computer, keep your digital files there until the storage hard drive has been backed up at the end of the day, just in case. Once the files have been backed up, you can delete them from your local computer.
8
Package the files
- Follow the instructions in the “Preserve: Ingest” section to create a package around the files that includes basic metadata and file fixity information.
9
Backup the storage device
- Backup the storage device after each day of capture.
- Check that the backup worked the next day.