Toolkit Overview : Define : Plan : GATHER : Preserve : Metadata : Storytell : Share : Recommendations
El Grito de Sunset Park Use Case
GATHERING CONTENT FROM HARD DRIVES
WHAT IS THIS?
This section will guide you through best practices for collecting media files from your hard drives. You will learn:
- How to safely offload digital files from a hard drive to your workspace.
- How to set yourself up to archive and work with your files.
WHY DO THIS?
By gathering your media in a systematic way, you will:
- Mitigate risks to your computers and networks.
- Ensure the files do not become lost, accidentally deleted, or corrupted during transfer.
- Be prepared to archive and work further with your files.
WORKFLOW AT A GLANCE
Malware can wreak havoc on your computer and present all kinds security risks.
Virus-scanning is especially important if you are receiving the drive from an external source, or if the files on the drive were obtained from external sources.
1
Install anti-virus software
If you don’t already have anti-virus software on your computer, you should! Some good free options include: Sophos, AVG, Avast, and Kaspersky.
2
Check hard drive for viruses
Run your anti-virus software on the hard drive. After viruses are removed or none are detected, you are safe to start accessing the drive.
FREE ANTI-VIRUS SOFTWARE
![]()
![]()
Sophos Home protects every Mac and PC in your home from malware, viruses, ransomware, and inappropriate websites.
![]()
![]()
AVG Antivirus Free is an antimalware security suite that includes an active file and email scanner, plus Web browsing protection.
![]()
![]()
Avast Antivirus is a family of internet security applications developed by Avast Software for Microsoft Windows, macOS, Android and iOS.
Don’t work off the original drive that the content was submitted on. Instead, work off a copy in case you accidentally delete or overwrite files, and so you can return the original hard drive to the owner as it was received.
It is important to make sure your files stay intact and unaltered when you transfer. It can also be important to show that your files are intact and unaltered, especially if you are using video for evidence.
Yvonne Ng,
3
Choose a reliable file copy tool
Copy the drive contents to a separate drive or storage location where you will be working. This can be a local, networked, or cloud-based location, depending on your needs. Dragging and dropping files in Finder works, but can be unreliable when copying a large amount of files, as you can’t confirm that the copy completed and you have to start over if it fails.
Rsync works better, but it requires you to use the command-line interface in Terminal (found in Applications/Utilities).
FILE COPYING TOOL
Rsync is an open-source utility for efficiently copying, transferring, and synchronizing files across computer systems. It offers many options for transfers (e.g. options for whole directories, preserving ownership and permissions, secure transfers, etc.)
4
Copy the files to your (local) workspace
When you open Terminal, you will see something like this:

Type the following command (spaces and capitalization count), substituting “/Source/harddrive/path” and “/Destination/storage/path” with the file paths for your hard drive and workspace:
rsync -rtv /Source/harddrive/path /Destination/storage/path
For example, the command will look something like this:

Press Return. A file list will appear in the Terminal window, and files will to appear in your destination storage location.
Rsync will exit by itself when it is done, and will give you an exit message like this:

If the copying failed (e.g. if the drive got disconnected, etc.), the exit message will tell you. Run the exact same command again and rsync will check and skip over files that have already been copied.
5
Copy the files to Google Drive workspace
If working with a remote team, it may be necessary to copy content to an online workspace. This is what we did with the El Grito project.
To expedite the analysis of a sample set of the thousands of El Grito videos, as well as explore workflows that were inexpensive, accessible, and sustainable long term, we researched and tested several platform options. For this phase, and this collection of content — most of which had already been publicly shared, we used Google Drive to store the files (and Google Sheets to inventory them).
We transferred all of the files meeting our Collection Policy guidelines to the Google Drive, including 30 MiniDV tapes we had digitized. Video content requires a lot of storage space, so we created a new account and upgraded the storage to 1T for $9.99 a month. Google Drive pricing plan information can be found here.
Between the existing digital files and newly digitized files, we had about 500 GB of footage to upload to our Google Drive account. This took about 10 days for the files to fully upload using an ethernet connection with an estimated 4.5 Mbps (megabits per second) upload speed.
Video footage can be hard to identify or interpret on its own. Documentation can help you better understand what the video shows. It is useful for the selection and ingest steps coming up, but also for the cataloging later on.
We introduce this step here because there may be valuable documentation in the hard drive you are copying that is important to collect.
5
Collect documentation files from hard drive
Locate and collect any documents on the hard drive that may be helpful in identifying or understanding the contents of the files to be archived. This can include case documents, event flyers, consent forms, transcripts, emails, etc.
6
Document directory / folder structure if relevant
In some cases, the way the original hard drive is organized (e.g. folder structure, folder names) is also helpful for identifying and understanding the files. If this is the case, you can:
- Refer to the original hard drive or be careful not to move files in your working copy. This is the most basic way, but you risk losing access to the information at a later time.
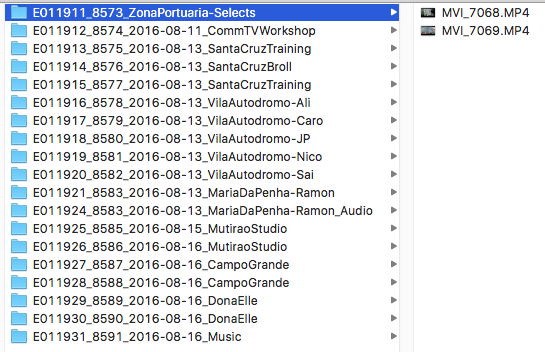
- Take screenshots of the directories as they appear in Finder. The upside of this is that it can be easily done, and then you don’t need to worry about whether you are moving files around while you work; the downside is that you can’t search filenames in the screenshots.
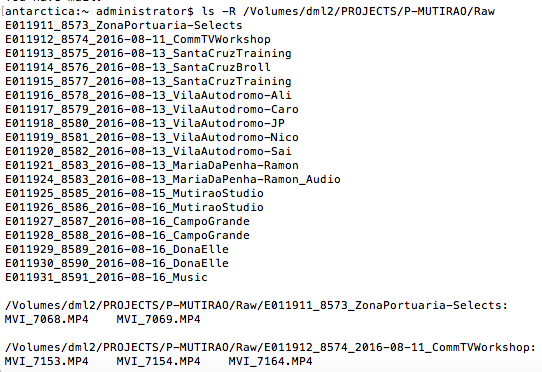
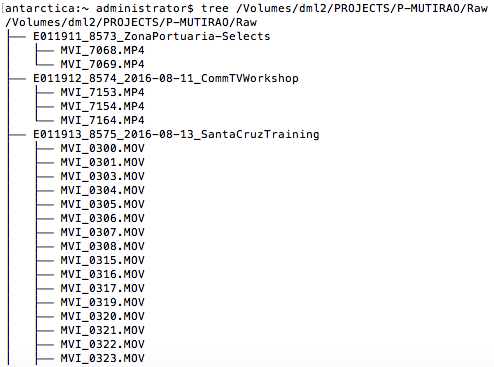
- Use command-line tools ls (built-in) or tree (needs to be installed) to create a text-based lists of folders and files. The upside of this is that the text is searchable; the downside is that it’s not easy to digest visually.
Put the documentation in a shared space where your volunteers can access for reference. For example, papers in a binder, or a folder in your digital workspace.
7
Collection documentation from external sources
This is also a good time to collect any other relevant electronic or paper documentation from external sources, such as news articles, links to websites, etc. that may help with making sense of your videos later on.
8
List the files
A basic inventory starts with a list of the files. In some cases, it may make sense to list each file individually, while in others cases it is more expedient to inventory groups of files, for example, on the folder-level. Listing of files can be done manually or in automated ways.
An easy way to generate a list of files, for example, is to use Text Edit, the built-in text editor on a Mac. Making sure it is in plain text (not Rich Text) mode, drag the files you want to list over the text editing window:
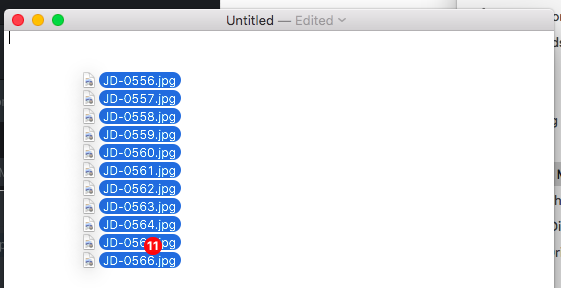

The full file paths will be printed in the Text Edit window.
For the El Grito project, we wanted both the file paths from the original hard drive as well as the file paths to the uploaded copies on Google Drive so the videos could be easily played from the Google Drive video player.
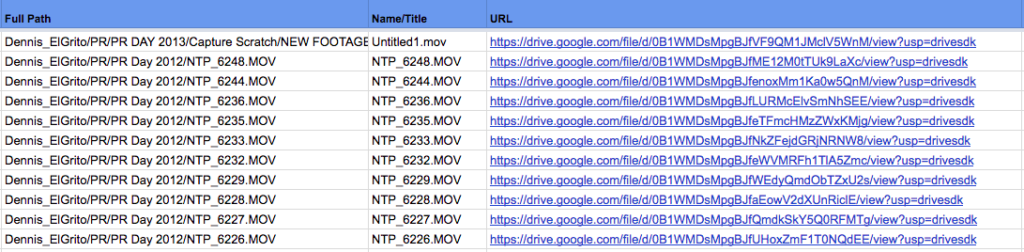
To generate the list of Google Drive file paths, we used a Google App script.
9
Add basic descriptive information
From there, you can add basic descriptive information to help you identify your files and understand what you have. Inventories are meant to be very basic, but you can build upon them to create more elaborate catalogs or databases. For more on this, see the Metadata section.